


How to Draw A Lake. There are few things quite as relaxing as sitting by a peaceful lake and watching the water lap in front of you.
Also, check our Easy Frog Coloring Pages.
It’s even better when you can enjoy it with your morning coffee from the deck of a cozy cabin! It can be nice to get away from it on a beautiful lake, but sometimes that’s not always possible.
Sometimes learning how to draw a lake is the best!
How to Draw A Lake
Step 1
In this how to draw a lake tutorial, we will draw a lake and some houses and trees for the surrounding area.
We’ll draw one of the little cabins by the lake for this first step.
We’re getting a bird’s-eye view of this lake, so it’s worth considering when designing the corner cabins.
To draw the first cabin, you can use straight lines to draw the cabin’s walls, windows, and roof. That’s all there is to do in this step, and you’re good to go!
Step 2
Now that you’ve drawn a hut for your lake, you should have no trouble drawing the next one.
This hut will look very similar to the first one, and you can even draw a nice pine tree in between.
Step 3
You have created the two huts for your drawing, and now you can add more details around them in this step of our how-to-draw-a-lake guide.
Firstly you can use straight lines forming a cross shape in front of the stalls for some small fences in front of them.
Then behind the two huts, you can draw other much larger pine trees.
Step 4
This adorable lake design you are working on needs to be near a forest, as we will add more trees in this step.
These trees will be the tallest of all so far and will be on the left side of the cabins.
Like the previous ones, they are drawn in several sections, each of which gets smaller towards the top.
Step 5
This picture already looks great, but it needs more trees to complete this beautiful setting in this step of our how-to draw a lake guide!
Then you can add more trees on the left side of the lake. Once you’ve drawn those details, you’re ready for the final step of this guide!
For this step, we will add three more trees on the right side of the lake.
We’ll add more details in the next step, but feel free to add your details, like even more trees and another cabin, if you’d like! When you’re ready, we need to add a few more details.
Step 6
For your drawing of the lake so far, we drew many different things, but none contained a lake.
We’ll fix that because it’s time to draw the lake itself! To do this, you can use a few curved lines to create the lake’s outline.
Then you can use more curved lines inside the perimeter of this contour.
Then you can add more trees on the left side of the lake. Once you’ve drawn those details, you’re ready for the final step of this guide!
We showed you how to color this drawing, but this is just a suggestion. You should use all your favorite colors to fill this picture and get creative!
Before proceeding, however, feel free to add as many details as you like.
You could complement the background by drawing some extra parts for it. You could add some nice mountains or clouds over the lake for some ideas.
Step 7
You’ve reached this tutorial’s final step on drawing a lake! You did a good job with this drawing, and now you can relax while coloring.
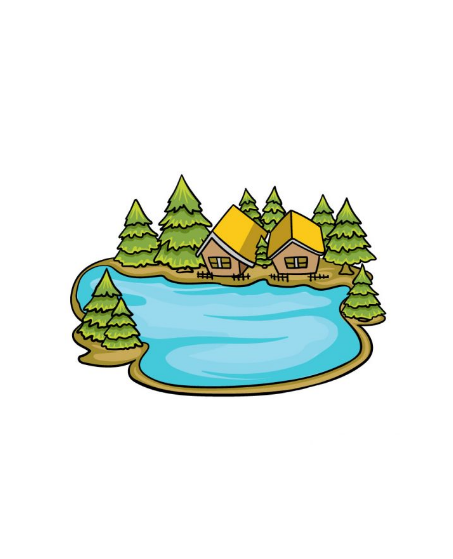
We showed you how to color this drawing, but this is just a suggestion. You should use all your favorite colors to fill this picture and get creative!
Once you know how you want to color it, you can have fun choosing the artistic media and tools you’ll use to do it.
For a drawing like this, it can feel good to use softer media like watercolor and colored pencils to fill in.
This is just one possibility, and it would also be great if you used lighter mediums like acrylic paint or colored pencils.
Your Lake Drawing is Finished!
Must Follow On Instagram.


